Creating architecture boards - Major project
Today I will be showing my process of creating my architectural boards for my major project.
Board 1
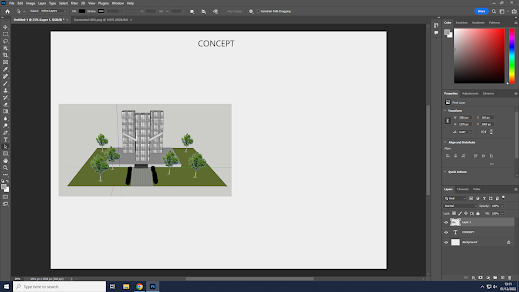
First I open a new page by clicking on 'new file', then on print and selected the A3 page and landscape mode.
Next I added my title by clicking on the 'T' tool on the left toolbar, I used 'Segoe UI Historic' font and 30pt size for that.
Here I added my image of the concept, I did that by clicking on 'file' on the top left, 'open', 'on your computer' and then chose my image from my files.
.png)
I then adjusted the size of my image and I added my concept text by using the same tool as before. I chose the same font 'Segoe UI Historic' font and 16pt size.
I also added some gray and black framing to it by clicking on the 'rectangle' tool and choosing the colours from the right settings bar.
This is the result for this board.
Board 2
For board 2 I started the same by opening a new page.
I added the location (which I changed from my original location which was Tokyo to Riyadh, Saudi Arabia), target, and demographics texts using the same tool, font and size.
Here I added images to support what I wrote, I did that by following the same process as before and then adjusted the placement and size.
Black and grey framing was added here as well.
This is the result of my second board.
Board 3
Here I added my sustainability, materials, information and details texts with the same font and size, 'Segoe UI Historic' font and 16pt size.
Then I added my images from the top setting bar and placed them to support my information/detail text.
This is the result of my third board
Board 4
For this board a new page was added too, the same with the background colour.
Then I decided to change the colour to a darker gray and then I added my elevation images.
Then after looking at it and getting some feedback I decided to change the arrangement of my images and make them bigger.
Here is the result of my fourth board
Board 5
I changed the colour for this as well, choosing the same darker grey.
I then added a title and my floor plan images with the same process.
Here I added text for my dimensions and decided to change the colour again to light blue but ended up deciding on a light grey.
This is the result of my fifth board.
.png)
.png)
.png)
.png)

.png)
.png)
.png)
.png)

.png)
.png)
.png)
.png)
.png)

.png)
.png)
.png)
.png)

.png)
.png)
.png)
.png)

.png)

.png)
Good that you have added this process and shown you can do this - we have discussed these boards in class and I am hoping that you might reflect on this for next term
ReplyDelete